Thursday, December 30, 2010

Subway Art

As I was looking at everyone's Top 10 Ideas from 2010 I noticed everyone's Subway Art.
I just think that subway art is the coolest thing, and not very hard at all.
So I decided I would try it out myself!


I picked the canvas up at Hobby Lobby for 1/2 off!
As I was looking around Hobby Lobby I saw the scrapbook pages were also 1/2 off so I thought I might try and add some of these into my subway art!
First I painting my canvas chocolate brown,
then I cut the scrapbook pages into a few rows.
I then got out my favorite crafting device...
and modpodged my paper onto my brown canvas!!
As this was drying I started printing out words on my silhouette machine to put on my canvas.
This was actually the hardest part, I couldn't think of words to put on there!
I started off with our families names, then just added words in as they came to my head.
And this is how it all turned out!
It's still a little wet in the picture, but I was super anxious to show everyone my first try at  Subway Art!!!

Parties I'm Linking Up With:
giveaways
Photobucket


The Trendy Treehouse

Beyond The Picket Fence
A Crafty Soiree
Get your craft on Thurs.


Wednesday, December 29, 2010

First Silhouette Project!!

So I bought my mom a Silhouette Machine for her birthday and we haven't gotten a chance to use it yet!!
So this afternoon I decided I was going to try and use it and spell out Kinsley Mae to put over the closet in the nursery!!
A few things to note if you have never used one before:
  • Your paper needs to fill the space of the cutting board because if it doesn't the paper will slide and the cut will get all sorts of messed up!
  • Fit as many letters/symbols as possible on one page so you don't waste your paper!!
I wish I would have known these things before because I used a whole role of vinyl spelling out her name due to all of my mess ups!
Since I am pregnant its not smart for me to get on the ladder to hang the letters so my best friend Sarah put them on the wall for me.
Didn't take her too long to get it perfect!!
Here's our finished project!

Doesn't it look beautiful??
My nursery is finally coming together!

Kinsley's Dresser

They always say "One man's trash is another man's treasure,"
WELL my mom was driving around on a Sunday night a few weeks ago,
and found this dresser on the side of the road.
Just so happens we have been looking for a dresser for my nursery.
After taking off those ugly knobs, and sanding the dresser all we had to do was paint!
We primed it using white spray paint, but then it started getting cold outside so we had to bring our project inside and roll painted the white paint on it!
Luckily Hobby Lobby was having 50% off their knobs:)
We picked out the crystal ones, they matched beautifully! 

And while me and mom were doing some Christmas shopping we found some super cute hotpink and white polka dot wrapping that we thought would look awesome in the drawers!
So I measured the bottoms of the drawers and cute the paper,
and with a little bit of modpodge they turned out perfect!
 
This is our finished project:

Sweet Kinsley's dresser looks PERFECT in her nursery!
Just a few more weeks and she will get to see it herself:)
Only 8 1/2 more weeks to go until she's here!


Tuesday, December 28, 2010

Squash Casserole

I've never been one to eat lots of vegetables,
especially vegetables that are not green.
Squash has never been one of my favorites,
but this Squash Casserole recipe I could eat all day!!
Ingredients:
2 1/2 lbs of Squash
3 T butter
2 eggs
4 T flour
Salt and Pepper to taste
1 Cup of Milk
8 oz of Chedder Cheese
Cracker Crumbs
First take your squash and cut them up in squares,
and boil them until they are nice and tender.
Then drain the squash so there is no water left,
and smash the squash up like smashed potatoes!!

Now your going to add your butter, it mixes better if you melt it.
Then add everything else, mix your flour, cheese, milk, and eggs in.
Pour some salt and pepper in at your own risk.
Then pour your everything into a 2 quart casserole dish,
and pour some cracker crumbs on the top.
Put that oven at 350 and let is cook for 30-45 minutes!
Make sure its brown and bubbles before you take it out!
Yum Yum:)
Hope everyone had a great Christmas, and is having a Happy New Year!!!


Tuesday, December 14, 2010

My December Danish

I needed a study break so I decided to make some dessert to snack on while I study all night!
I decided to make some danishes because they are so quick and simple!
And of course I'd share it with all of you:)
December Danishes
1 cup of sugar
8 oz. of cream cheese
1 stick of butter
1 container of croissant rolls

First you take your softened cream cheese and mix it with the sugar.

Then you will unroll the croissant rolls, and spread some of the sugar and cream cheese mix onto the croissant.

After the mix is in the croissant you will roll the croissant up normally, then pour some melted butter on the top of the croissants. I even added a little bit more sugar to the top of the croissants to make them extra tastey!

Set your over to 350 and bake for about 10-15 minutes!
Now me and my roomie have something yummy to eat while we study!


My party spots:


Saturday, December 11, 2010

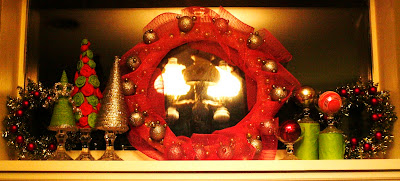
Decorating the Mantle.. Well Decorating the Window Sill!

Most people this Christmas are decorating their mantles, but I am decorating our window sill!
Our new house doesn't have a mantle in our living room, so I had to improvise a little!
I started making these three little trees:
These trees are so simple to put together!
All you need is a few paper plates, tissue paper, double sided tape, and anything else you have laying around the house that would look good on your tree!
Take one of your paper plates and make a cone. To make the bigger cone, use two of the paper plates and make a cone and stack them together.
You can do a lot of different things with the tissue paper, for my smallest tree I just twisted little pieces of the lime green tissue paper and wrapped it around the tree. 
After I finished these trees I placed them on little candle sticks I got at Dollar Tree!
Turned out very cute!!
Then I started on my mini wreath's.
These were very simple to make!
I bought the wreaths and the ornaments at Hobby Lobby this morning for 1/2 off!
I just wrapped these tiny ornaments on the wreath!
I now had half the window sill down!
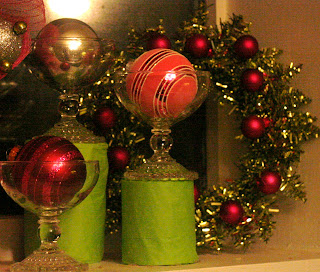
For the right side of the window sill, I took 3 of our glasses and just placed 3 ornaments in them!

To make them at different heights I just picked out 2 different sized canned goods in our pantry and wrapped each of them with lime green tissue paper!
Now that both sides are done, I made a big wreath for the middle!
This was also really simple to make!
I bought a wire wreath and wrapped it in hot pink tissue paper.
Then I took some white sparkly tulle and wrapped it around the tissue paper.
I stuck some little green ornaments and shoved them in the tulle.
Then I hot glued the silver ornaments to the tulle.
And lastly I wrapped the whole wreath with hot pink tulle and I was done!
Finished project:
Yayy!! My wanna be mantle is complete:)  


I party with:


UndertheTableandDreaming

 
Photobucket